Table of contents
- Key Takeaways
- What Is a Private Label RV Appliance Program?
- Prerequisites: RV Appliance OEM and ODM Requirements
- Private Label RV Appliance Program: 6 Steps From Brief to Retail-Ready Pack-Out
- Step 1: Select Your Sourcing Model
- Step 2: Build the Margin and Tooling Stage-Gate
- Step 3: Define OEM Requirements and Build the RFQ Brief
- Step 4: Prototype and Brand Visible Differentiation
- Step 5: Validate the Pilot Lot Before You Approve Scale
- Step 6: Validate Transit, Vibration and Retail-Ready Pack-Out
- Troubleshooting Private-Label RV Appliance Programs
- Conclusion: Run the Program as a Sequence
- Frequently Asked Questions About Private Label RV Appliance Programs
A note on the figures. The margin bands, tooling costs and pilot findings below come from Gulfstone production, tooling and quality-control records in Foshan, plus a 14,000-unit RV water heater program. Client-identifying details are withheld, so read them as evidence of a pattern, not an industry benchmark.
Key Takeaways
- A private label RV appliance program is built to your specification and brand, so margin depends on compliance, tooling and channel readiness before the first order.
- Hybrid private label on a proven platform is the lowest-risk first move for most RV product lines.
- Branded third-party distribution returns 18–22% gross margin; custom private-label programs reach 38–46%.
- A $34,000 door mold for a 400-unit order never paid back. Rebuilding it as a standard base with a custom fascia cut tooling 71%.
- Verify the CSA file number inside the certifier’s own directory before you book freight, not after.
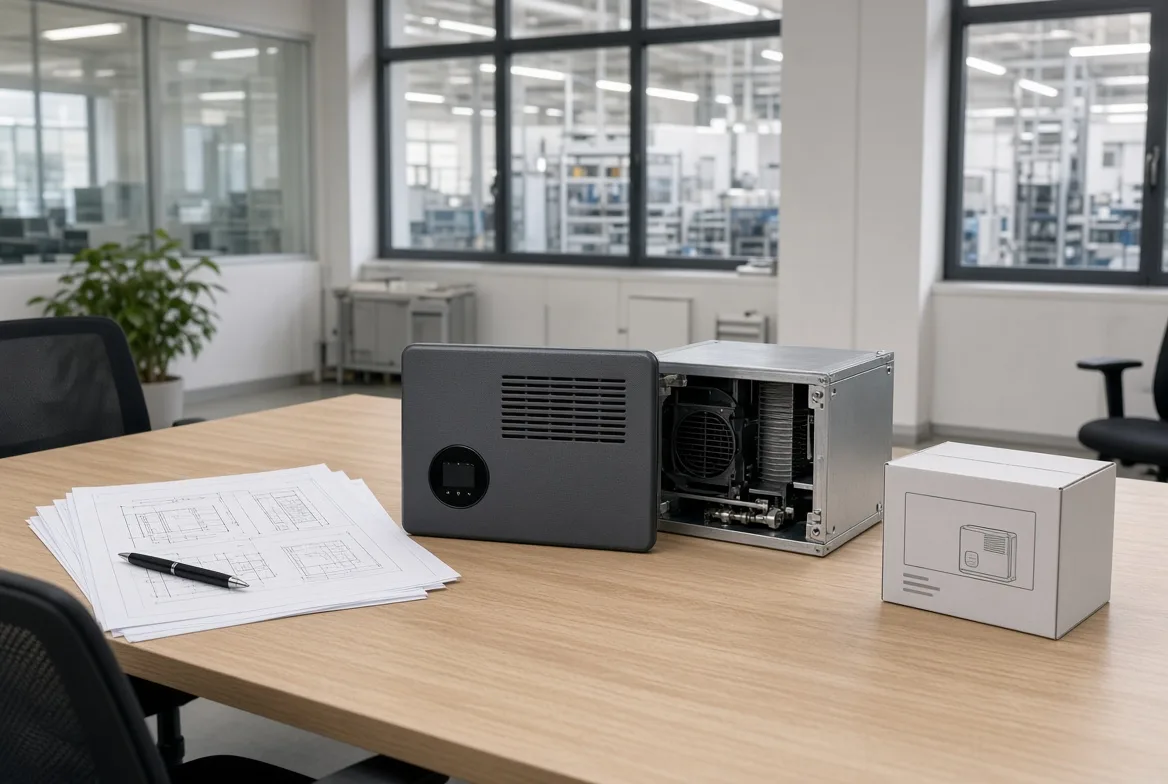
Private label RV appliances are units built by a contract manufacturer to your specification and brand. The margin upside only appears when compliance, tooling investment and channel readiness are scoped together.
This six-stage SOP runs from concept and tooling through packaging validation and market entry. It comes from a 14,000-unit RV water heater program, factory sampling runs and Gulfstone’s production records in Foshan.
Branded third-party distribution returns 18–22% gross margin. Custom private-label programs reach 38–46%. That gap disappears the moment a team skips the preparatory work. The SOP enforces design control, certification proof, packaging durability and margin discipline before you release a production purchase order.
For the finished, certified products this process produces, see the RV water heater range.
What Is a Private Label RV Appliance Program?
A private label RV appliance program is a contract-manufacturing arrangement: a factory builds a safety-critical appliance to your drawings and ships it under your brand. You own the specification, the branding and the commercial risk. The factory owns the process control that makes the specification repeatable.
The distinction that matters to a buyer is where the specification comes from. In a branded-distribution deal, you resell an existing SKU. In a private-label deal, you control the geometry, the control overlay, the packaging and the service parts.
That control is what unlocks margin, and it is also what unlocks cost. Every custom part adds tooling, validation and a corrective-action surface. The six stages below exist to keep that trade under control.
⚖️ Trade-off: Margin and risk move together. The wider the visual and functional differentiation from the platform, the higher the tooling and certification burden.
Prerequisites: RV Appliance OEM and ODM Requirements
RV appliance OEM and ODM programs start with locked requirements before any RFQ leaves your desk. On a recent 14,000-unit RV water heater rollout, every missing input delayed tooling by three weeks.
In the same program, three separate tooling reviews slipped because the forecast was still a range. Fix these inputs in writing first.
Minimum Inputs, in Writing
- Target category: RV water heater, portable unit, or accessory SKU
- Annual forecast: one fixed number, not a range
- Price band and margin goal: separate line items
- Warranty: coverage term, labour coverage, spare-parts policy
- Launch window: reverse-scheduled against the spring catalogue release
- Category reference: RV Industry Association guidance, NFPA 1192, and the active certifier or lab directory
Named Owners With Signing Authority
- Engineering owner: approves drawings and samples
- Sourcing owner: approves tooling spend
- Compliance owner: approves certification spend
- Packaging owner: approves drop-test results and artwork
- One final approver who releases tooling and certification payments
⚠️ Safety Gate: Gas appliances, ignition systems and low-voltage control boards are not general housewares. Secure a documented listing path, installation documents and traceable component files before production approval. No valid listing path means no purchase order.
Path check: the recommended route is hybrid private label built on a proven platform. Pursue full OEM only when volume, timing and IP requirements justify the cost. That scope is set out on the RV OEM solutions page.
Private Label RV Appliance Program: 6 Steps From Brief to Retail-Ready Pack-Out
The six stages below carry the program from sourcing model and tooling stage-gate through prototype, pilot validation and retail-ready pack-out, so nothing scales before the brand and the margin are proven.
Step 1: Select Your Sourcing Model
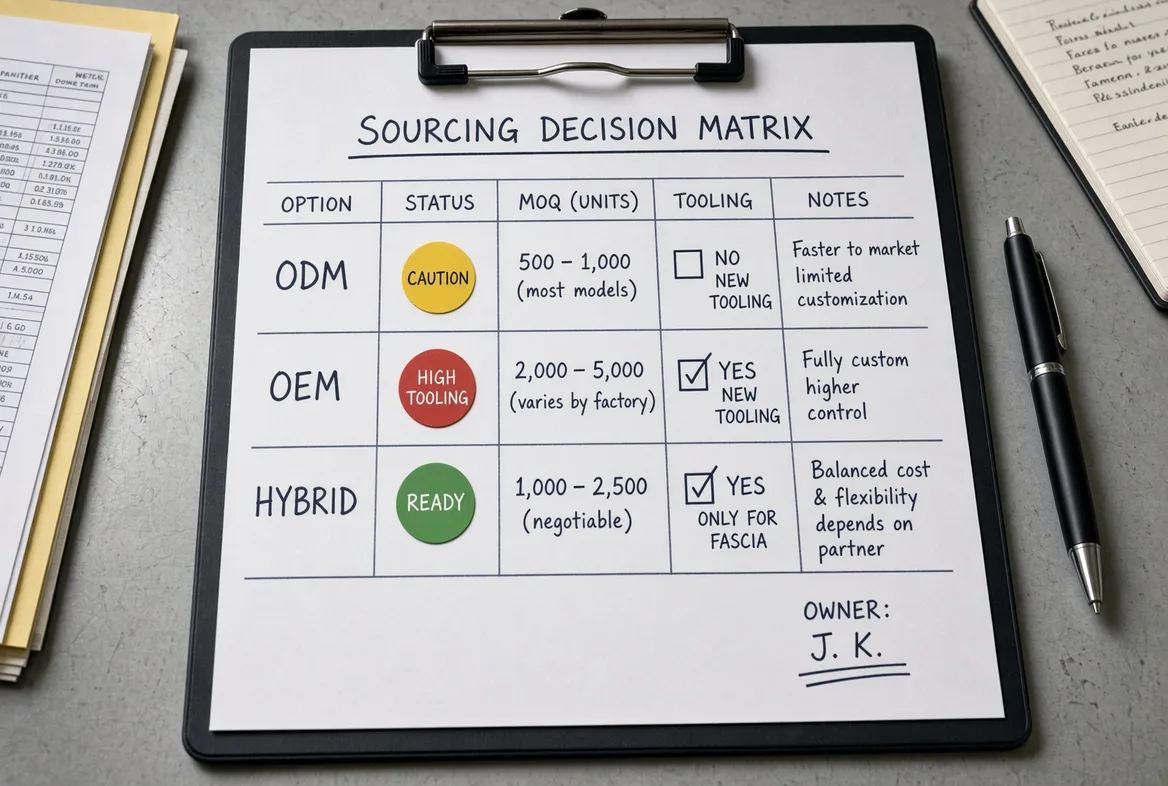
The first decision is the sourcing model, and it sets every cost downstream. The choice is not a slogan; it is a question of who owns the specification and who pays for the tooling.
ODM means you buy an existing chassis and platform: faster launch, lower upfront tooling, limited visual differentiation. OEM means the buyer controls all specifications, retains stronger IP ownership, and accepts higher tooling and validation costs. Hybrid sits between them.
On one RV water heater program, a team spent five weeks pushing for full OEM before they had any volume data. They should have started with hybrid and earned their way to OEM.
- ODM: an existing chassis and platform. Faster launch, lower tooling, limited differentiation.
- OEM: you own the drawings and the IP. Validation costs rise alongside every custom change.
- Hybrid: a standard chassis paired with custom fascia, control overlays, branding, packaging or access-door components.
Hybrid is usually the lowest-risk first move for an RV product line. It preserves the platform’s existing certified status while letting your brand achieve the visual and merchandising differentiation dealers look for.
Move to full OEM only when chain-wide volume, dealer exclusivity or platform lock-in justifies the investment. Standard platform MOQ bands start near 50 units per SKU, so hybrid lets you test demand before committing to heavy tooling.
Sourcing leads who run these portfolios agree on the sequencing. Michelle Wang, a hardware sourcing specialist, frames the MOQ band as the gate that decides whether customisation is affordable at all, rather than a number to negotiate down.
The supporting certification path should already be known at this stage, because it constrains which parts may be customised.
⚡ Speed Check: Building this one-page matrix took 90 minutes. It replaced an RFQ cycle that would have run two weeks.
Step 2: Build the Margin and Tooling Stage-Gate
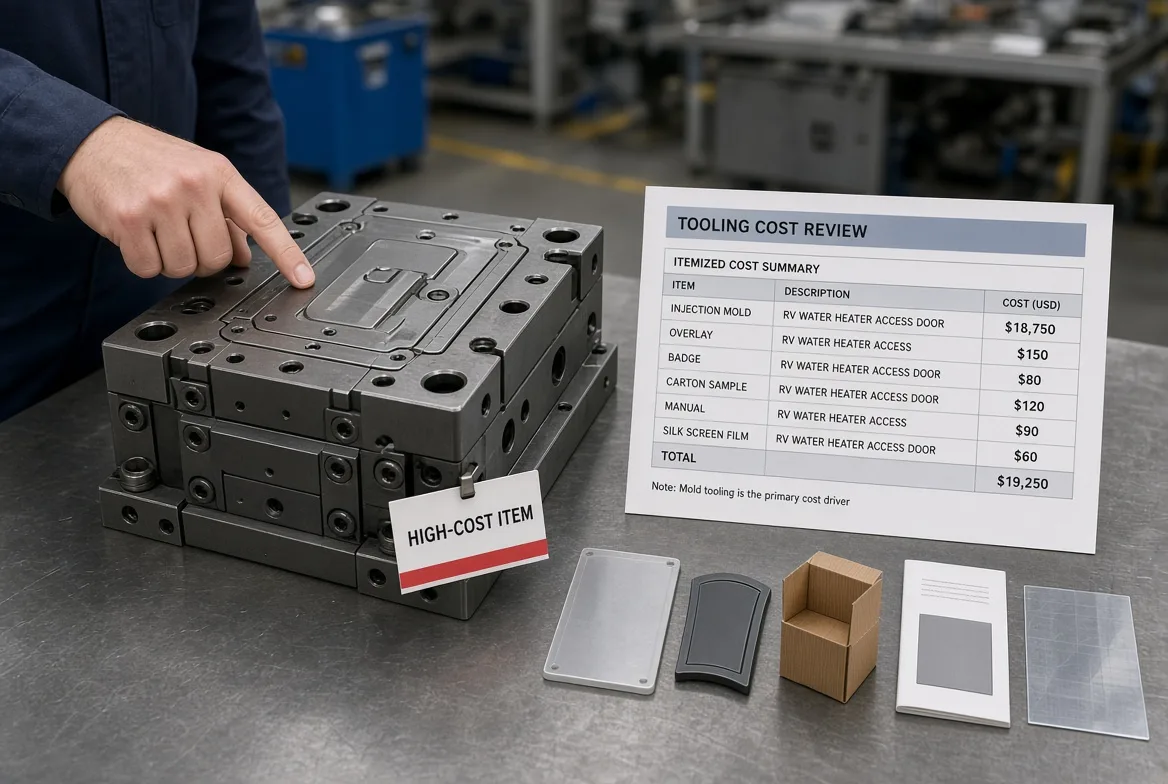
Is ODM cheaper than OEM? Usually yes, but not always. ODM delivers savings when volume stays low, tooling costs are high and the channel cannot support premium pricing. Above 2,000 units with dealer exclusivity, the economics shift.
Turn margin analysis into a formal stage gate. The 14,000-unit water heater cohort returned 18–22% gross margin through branded distribution. The private-label build reached 38–46%. That spread covers engineering and tooling only when the program hits its required volume.
Match your customisation level to the MOQ ladder:
- Logo-only or sticker branding: roughly 50–200 units
- Mid-level hardware customisation: roughly 500–1,000 units
- Full custom OEM/ODM: 2,000+ units
Gulfstone’s lead industrial design and tooling engineer puts the rule plainly: “Low opening volumes and full custom tooling do not mix. We use modular injection molds for visible parts such as water-heater access doors, while the chassis and hidden internals stay standard.”
Allocate custom budget to the parts a buyer sees: fascia, control lens, door geometry, silk-screen artwork, manuals, cartons and blister packs. Keep sealed combustion internals and proven chassis geometry standard for the first run. The financing logic here is the same one that governs tooling and IP ownership in any build.
This margin-planning framework also draws on perspectives from Kevin Leung, a global OEM manufacturing advisor who models tooling ROI for cross-border hardware brands.
🔬 Sensory Check: A mature cost table lists five low-cost items and one high-cost component carrying most of the financial risk. Every line ties to unit cost, tooling expense and a reorder assumption.
⚠️ Experience Warning: One client approved a $34,000 door mold for a 400-unit order with no reorder plan. The investment never paid back. Rebuilding the door as a standard base with a custom fascia cut tooling costs by 71%.
Payback rule: if the first production run cannot recover tooling costs under realistic reorder projections, default to hybrid or branded ODM.
Step 3: Define OEM Requirements and Build the RFQ Brief
For RV appliances, OEM requirements mean the buyer owns specification, compliance, documentation and integration before any tooling approval.
The scope covers dimensions, cutout envelope, voltage architecture, amp draw and thermal load, plus ignition and control logic, corrosion resistance, spare parts, packaging format and target channels.
NFPA 1192 governs RV fire and life-safety integration, while the NFPA 70 National Electrical Code and the ANSI/RVIA DC standard govern electrical architecture. Third-party listing — CSA, UL or Intertek — applies only where the product category requires it.
Documentation discipline comes next. Request certificate file numbers, installation manuals, wiring diagrams, service manuals, BOM control protocols and engineering-change rules before tooling approval.
Keep the management-system certificate — commonly an ISO 9001 registration — separate from the product listing. One proves process control; the other proves the appliance.
Gulfstone’s lead industrial design and tooling engineer was blunt about the boundary: “If the BOM revision trail is missing, we stop the work. One unchecked part number can void an entire listing.”
Apply the RV-specific performance requirements as well. Low-voltage tolerance, vibration resistance, wiring strain relief, moisture protection and anti-rattle mounting are not optional extras.
🔬 Sensory Check: A complete specification packet opens with a one-page matrix. Every row shows a plain-text status (Ready, Conditional or Blocked), not colour coding alone. Certificate numbers, cutout dimensions, amp draw, thermal load and service part numbers all carry named owners.
⚠️ Experience Warning: Missing wiring diagrams once delayed a control-board launch by six weeks. No complete documentation means no tooling approval.
This stage is complete only when one document packet carries three formal sign-offs: engineering, compliance and category management. The quality control gates that later verify the build should be named here too, so the RFQ and the inspection plan agree.
For a 12V DC compressor refrigerator private-label program, start with the visible differentiation rather than generic supplier shopping. Prototype the fascia, control overlay, logo and packaging on a proven 12V platform before any internal redesign.
Step 4: Prototype and Brand Visible Differentiation
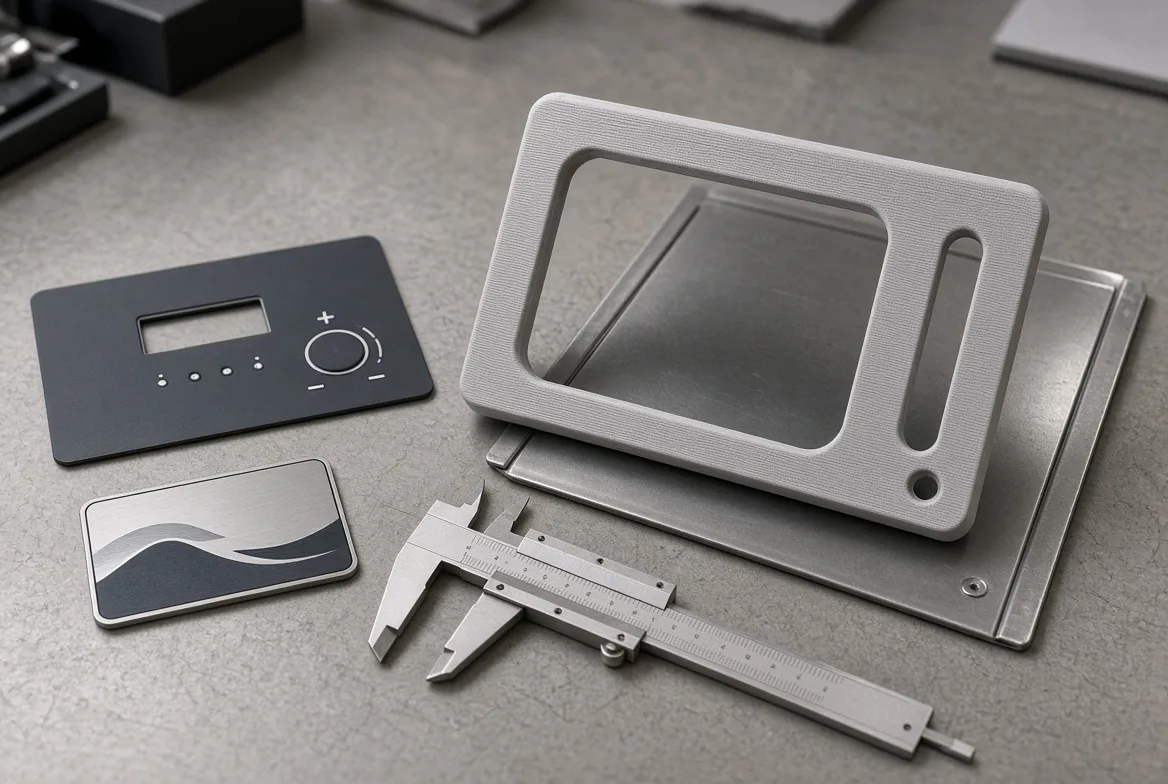
Sourcing a private-label refrigerator or heater program starts with visible differentiation, not generic supplier shopping. Keep the initial investment low: rapid 3D prototyping first, then fascia stamping, control overlay refinement, logo execution and carton-face customisation.
Start with a proven platform, customise only the brand-facing exterior elements, and delay deep internal redesign until sell-through is validated. On one trial private-label launch, the buyer skipped this step and spent 90 days building a full chassis mold before the first container shipped.
Four prototype stages run in sequence:
- A 3D-printed or CNC mockup for fit check and shelf presentation
- A fascia or access-door geometry review
- Custom artwork placement for silk-screen branding or a badge/sticker implementation
- A blister-pack or accessory presentation concept for spares, manuals and install kits
Gulfstone’s lead industrial design and tooling engineer again: “Modular molds limit financial exposure on low-volume launches. We create distinctive outer geometry and branded surfaces without cutting a full chassis mold.”
The primary branding route is a durable overlay on an existing housing. The alternative is a deeper tooling revision for the fascia or access door when exclusivity matters more than speed. The full set of custom options sits on the OEM & ODM page.
⚡ Speed Check: The 3D-printed fit mockup took 48 hours. The sheet-metal fascia sample took two weeks. Budget both timelines before you commit to a dealer launch date.
🔬 Sensory Check: Run a finger along panel edges for burrs. Test the latch operation and the button travel. Inspect the surface finish. Ask one question: does the branded fascia look integrated into the unit, or bolted on after the fact?
This stage is complete when the prototype fits the RV mounting envelope, the brand-facing parts match the visual brief, and the team can state which parts use new tooling and which are inherited from the standard chassis.
For a branded RV tankless water heater program, approval follows only after the pilot lot passes certification review, performance checks and end-of-line control testing.
Step 5: Validate the Pilot Lot Before You Approve Scale
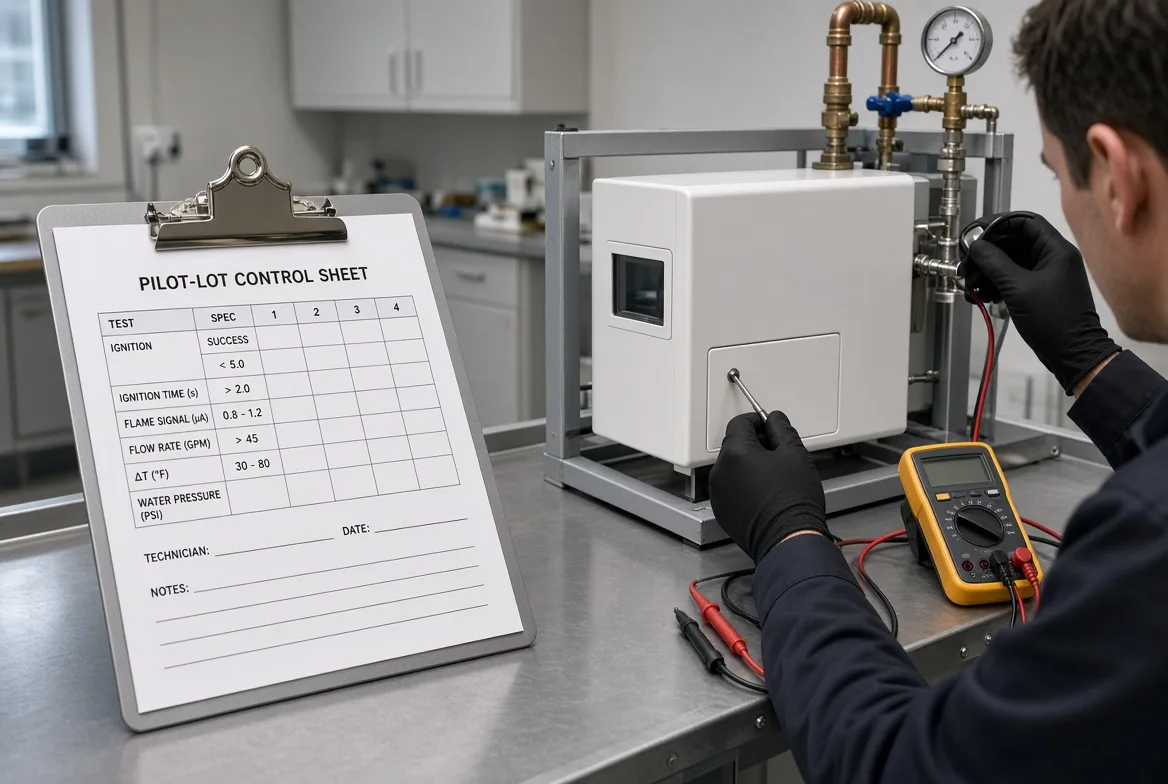
A private label RV tankless water heater program is not approved because a prototype looks finished. It is approved when the pilot lot passes certification review, performance checks and end-of-line quality control. Approve production on certification proof and pilot data, not on a sales pitch.
Step 4 validated visual fit and appearance. This step validates functional performance. For the 14,000-unit cohort, nine pilot units were pulled before a single scale purchase order was released.
For the tankless unit, the checks were 12V ignition behaviour, control-panel function, ignition reliability across five cold starts, flow stability at low and high ranges, and the rated output band. Run the pilot checklist in order:
- Incoming material review against the approved BOM revision
- Branded-part cosmetic checks on fascia, overlay and logo
- Combustion and electrical safety checks
- End-of-line function testing on every pilot unit
- Carton fit verification using drop-tested retail packaging
- Engineering sign-off on every deviation, documented in writing
Certificate discipline: request the CSA file number or equivalent identifier, then verify the number directly inside the certifier’s public listing directory. Screenshots and generic PDF certificates are not proof of scope.
First-pass yield figures sit under NDA, but the margin band holds only when pilot yield supports scalable economics. A pilot that scraps one unit in five erases the entire margin advantage.
🔬 Sensory Check: Press the power button — the panel backlight should hold steady, with no flicker or dead segment. Listen for one sharp ignition click, then the burner lighting within about two seconds. Feel the valve detent and shake the housing for rattle at the mounting points.
⚠️ Experience Warning: One pilot passed every performance check but developed a rattle at the rear mounting bracket after vibration testing. Manually shaking the unit caught it. The fix took two days; shipping defective units would have cost a dealer relationship.
Approve the pilot unit, the certification evidence and the corrective-action log together, not as separate items. Justin Peng, an HVAC engineer, makes the same point about acceptance testing: a unit signs off on the worst cold start, not the best one. The inspection standards this depends on are documented on the quality control page.
Step 6: Validate Transit, Vibration and Retail-Ready Pack-Out
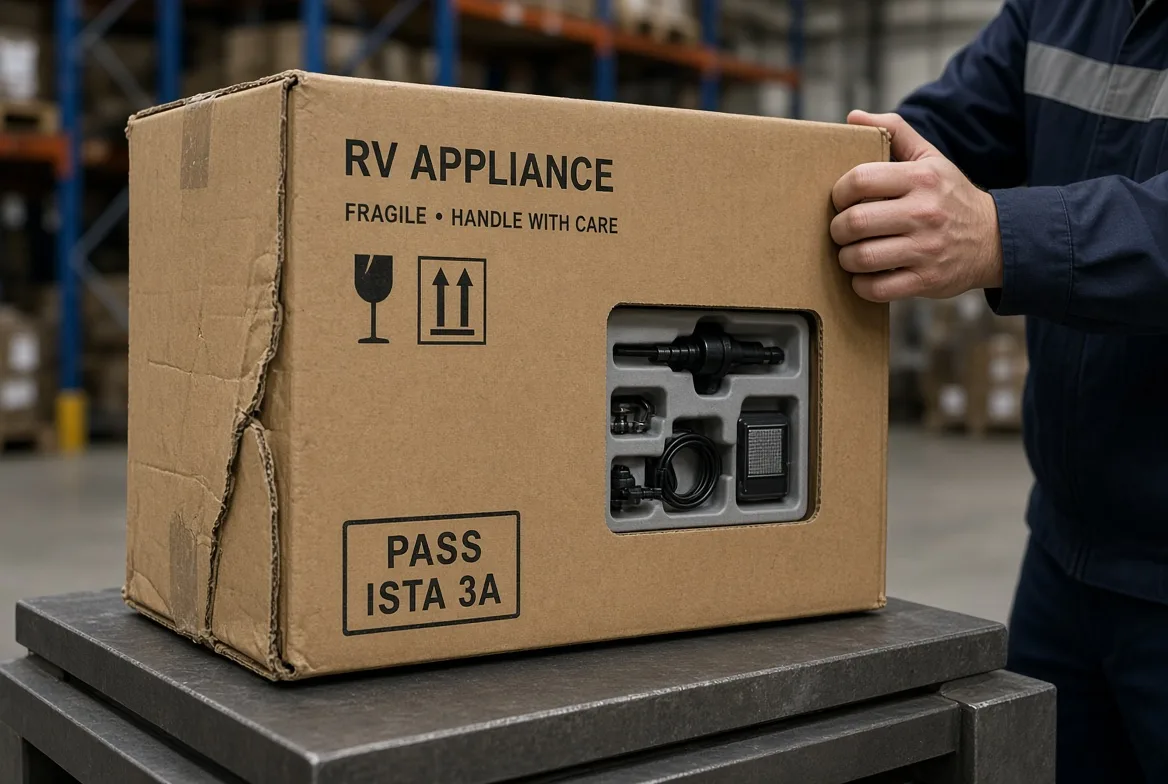
Factory-direct OEM vibration standards are only half the requirement. Passing product bench testing does not clear the program for launch — it launches only after surviving road vibration, parcel handling, wholesale receiving and retail presentation.
Step 5 proved the unit works; this step proves it survives shipping. On a rooftop AC pilot, the unit passed bench tests but shed a shroud screw inside the carton during shake testing. Shaking the sealed carton caught it.
The final gate covers:
- Vibration and shock performance for mobile RV applications
- Mounting and strain-relief review
- Branded manual and accessory-pack accuracy
- Drop-ship and wholesale carton design
- Palletisation and GS1 label compliance
NFPA 1192 and ANSI/RVIA cover vehicle integration, but RV vibration benchmarking follows automotive-style swept-sine and random profiles defined by bodies such as SAE. The rooftop unit held at the mounting feet and failed at the accessory brackets.
Customise the blister pack so every accessory locks into a defined position. Drop-test the drop-ship carton to ISTA 3A standard, with the distribution-cycle profile cross-checked against ASTM D4169, and complete pack-out checks for wholesale, dealership or marketplace fulfilment.
Primary route: wholesale and dealership packaging with drop-ship tolerance built in. The alternative for direct-to-consumer or FBA-first sales needs stricter parcel-abuse resistance and a tighter insert design.
🔬 Sensory Check: Press the carton corners — crushed corners mean insufficient stiffness. Press the insert; it should resist thumb pressure. Shake the carton for internal rattle. Opening it should feel controlled, with every part seated in its cutout.
♿ Accessibility: Do not rely on colour coding. Print “PASS: ISTA 3A” with the test date and reviewer initials in the same spot on every carton.
⚠️ Experience Warning: One dealer shipment arrived with 9% damage because a DTC carton was reused for palletised freight. Rebuilding packaging for wholesale stiffness cost 11 days and pushed the spring launch window.
The gate closes when one approved unit survives transit abuse, arrives shelf-ready, and ships with a full compliance and support document packet. Reorders and field service then run on the terms set out on the after-sales page.
Troubleshooting Private-Label RV Appliance Programs
1. Certificate Does Not Match the Branded Unit
Problem: mismatched file numbers, scope definitions or labelled model families. This is the most damaging failure because it detains a whole container, not one product.
Solution: stop the PO and verify the file number inside the certifier’s listing directory — CSA, UL, TÜV or Intertek. Match the carton, manual and nameplate model numbers to the BOM. Resume only when labels and manuals fully align, because a mismatch is what turns a compliant unit into a customs hold.
Proof: one matched file/model/BOM packet signed by compliance.
2. Too Much Custom Tooling for Too Little Volume
Problem: low launch volume paired with full custom tooling. One client approved a $34,000 door mold for a 400-unit order with no reorder plan, and it never paid back.
Solution: roll back to a modular or hybrid architecture. Keep the standard chassis and move differentiation to fascia, overlays and cartons until reorder velocity justifies the full investment.
Proof: a payback model showing the first run recovers tooling cost under realistic reorder forecasts.
3. Packaging Fails in Parcel or Dealer Handling
Problem: a plain neutral carton may pass lab review while branded finished packaging still fails in transit. One dealer shipment arrived with 9% damage from a reused DTC carton.
Solution: re-run ISTA 3A for wholesale logistics, strengthen corner protection and insert retention, and retest the final branded pack-out rather than the neutral carton.
Proof: “PASS: ISTA 3A” stamped with date and initials on the branded carton.
4. Pilot Units Show Electrical Instability
Problem: bench tests pass, but field customers report faults. A rattle issue was found only by manually shaking the unit — a two-day fix that saved a dealer partnership.
Solution: require converter and low-voltage tolerance checks, wiring strain-relief review, anti-vibration mounting validation and a published service bulletin before release.
Proof: a signed corrective-action log plus a released service bulletin.
🛡️ Prevention: Verify every CSA file number the day you approve tooling, not the day you book freight. Certification scope language can change without notice.
Conclusion: Run the Program as a Sequence
Launching private label RV accessories and aftermarket components is a staged rollout, not a one-time bulk purchase. Lock the sourcing model, the economics, compliance, prototyping, pilot validation, packaging and launch controls before you scale production, and tie every decision to volume, tooling cost and channel readiness.
This sequence came off a 14,000-unit RV water heater program, where every skipped stage gate later surfaced as unplanned cost.
Build the RFQ packet, shortlist one pilot SKU, set the tooling or no-tooling threshold, schedule sample-review dates, and lock a reverse calendar against the spring launch. Do that before releasing any scale purchase order.
If you want a second set of manufacturing engineers to review your packet, reach out through Gulfstone contact. The clearest first checkpoint is an RV OEM scoping review.
Sourcing disclosure: Some examples here come from Gulfstone production, tooling and quality-control records. Client names are withheld. Validate every product decision against your own compliance and margin requirements. I receive no manufacturer kickbacks for these findings.
Frequently Asked Questions About Private Label RV Appliance Programs
1. What is the difference between OEM and ODM manufacturing?
ODM means you buy an existing chassis and platform, so launch timelines are faster and upfront tooling is lower. OEM means the buyer controls specifications and retains stronger IP ownership, with a higher tooling and validation burden.
In an RV appliance program, hybrid blends the two: a standard chassis with custom fascia, control overlay, branding, packaging or access-door elements.
2. Is ODM cheaper than OEM?
Usually yes, but not always. ODM costs less when volume stays low, tooling investment is high and the channel cannot support premium pricing. Above 2,000 units with dealer exclusivity the economics shift, and ODM is no longer cheaper than OEM. Volume, tooling and channel value decide the outcome, not marketing slogans.
3. What do OEM requirements mean for RV appliances?
OEM requirements mean the buyer owns the specification, compliance, documentation and integration duties before any tooling approval.
That scope covers dimensions, cutout envelope, voltage architecture, amp draw, thermal load, ignition and control logic, corrosion expectations, service parts, packaging format and target channels. NFPA 1192 governs RV fire and life-safety integration.
4. How many units do I need for private label RV appliances?
Private label RV appliances scale on a roughly three-step MOQ ladder. Logo-only or sticker branding starts at 50 to 200 units. Mid-level hardware customisation runs around 500 to 1,000 units. Full custom OEM or ODM typically requires 2,000 or more. Standard platform MOQ bands start near 50 units per SKU.
5. What certifications do RV appliances need in North America?
RV appliances require third-party listing only where the category mandates it, with CSA or UL being the common paths.
NFPA 1192 governs RV fire and life-safety integration, while NEC and the ANSI/RVIA DC standard govern electrical architecture. Always request the CSA file number and verify it inside the certifier’s public listing directory — screenshots and generic PDF certificates are not proof.

Forward
Co-founder & General Manager, GulfstoneGas appliance manufacturing and certification
Most of what decides a gas appliance is settled before anything is built — on the drawing, at the cut-out, in the tolerance someone chose for the gas path. I have spent my working life on the manufacturing side of that decision, and this is where I write down what it has taught me.
Nothing here is written from a sales desk. Every note comes off the floor: a batch held until a reason was found, a fitting that failed in transit, an approval path that only made sense once the destination market was fixed. If you read these first, the opening conversation starts at the standard rather than at the beginning.
- Gas water heater engineering
- Design for manufacturing
- Certification path selection
- Private-label tooling
- Off-grid and outdoor water heating
- Top 8 Outdoor Portable Gas Water Heater Factories in China for B2B BuyersNov 4, 2026
- Custom RV Appliance Industrial Design: An OEM Brief to a Validated PrototypeNov 3, 2026
- How to Build Custom Thermostat UI Design Software for OEM Embedded PanelsNov 3, 2026
- Top 8 RV Water Heater OEM Suppliers Canada: Vetted for Volume BuyersNov 3, 2026
- Top 10 Portable Propane Water Heater Manufacturers USA: A No-Hype Buyer ShortlistNov 2, 2026
- PPWR Compliance Checklist for EU Water Heater Packaging: The 10 Documents Before the Container LoadsNov 2, 2026
Fifteen years in appliance manufacturing — home appliances, RV refrigeration, then gas water heating — from the drawing to the shipping container.
Leads Gulfstone's design-for-manufacturing reviews and the certification path selected for each destination market.
Works directly with OEM and private-label buyers on tooling, tolerances and the approval file.