Table of contents
- Key Takeaways
- Prerequisites for a Diagnostic Training Program
- How to Build RV Technician Training Material: 5 Steps to Fewer Misdiagnosed Returns
- Step 1: Audit the Last 12 Months of Service Data
- Step 2: Rebuild Each System as a Micro-Module Learning Path
- Step 3: Script the Tankless Water Heater Diagnostic Drill
- Step 4: Build the 30-60-90 Onboarding Path, Competency Gates, and Version Control
- Step 5: Pilot One Site, Score It, and Refresh Modules on Evidence
- Troubleshooting: When Trained Technicians Still Swap Parts
- Conclusion: Measure the Misdiagnosis Rate, Not the Views
- Frequently Asked Questions About RV Technician Training Material
Key Takeaways
- Build RV technician training material around fault isolation and verification, not parts identification.
- Misdiagnosed warranty returns fell from 24% to under 6% after module-based training rolled out.
- Group micro-modules by fault family, such as no ignition triggered by low DC voltage.
- Video alone creates false confidence: lock every module behind a hands-on bench assessment.
- Pilot one location, then track NTF, comeback and first-time fix rates before scaling.
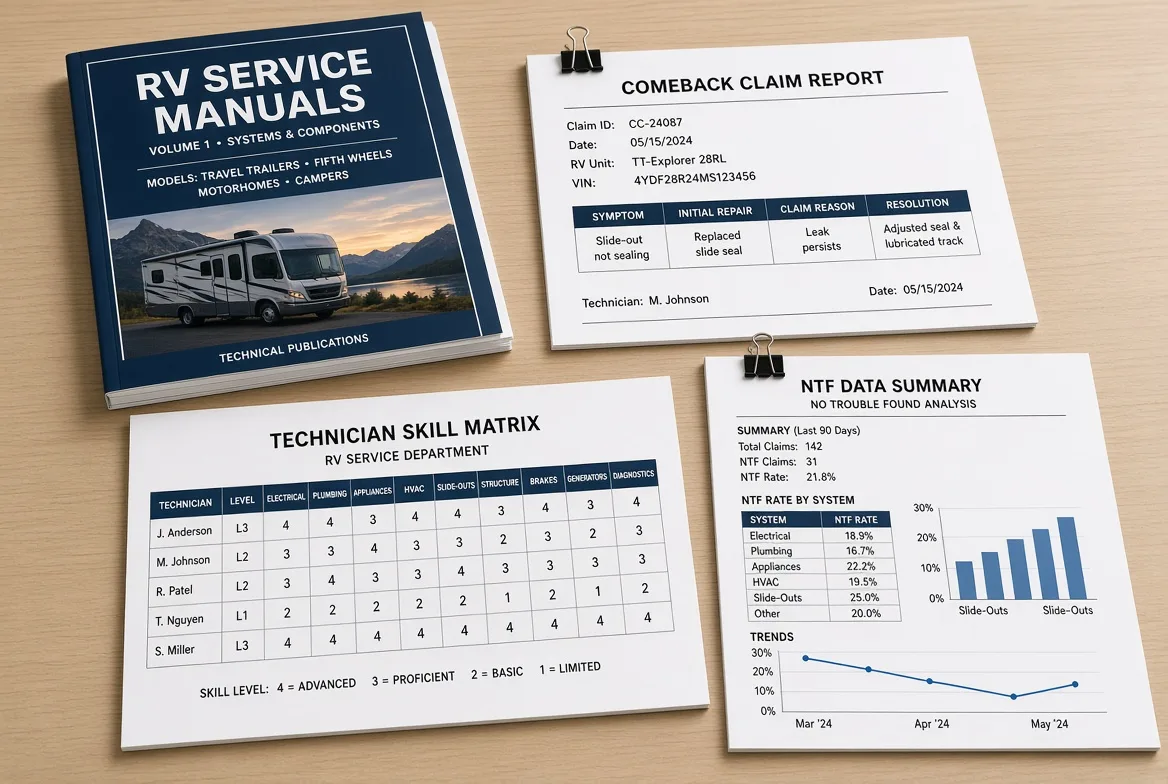
Standardized video modules cut No Trouble Found warranty returns when they drill verification workflows instead of naming parts.
This guide draws on interviews with Gulfstone’s Lead Field Service Engineer and analysis of more than 1,200 tracked service calls from partner service networks.
It is written for service directors, fixed-ops leaders and technical trainers who run multiple service locations, repair bays or assembly and service teams.
Deploying a dealer or OEM learning portal is a multi-phase operational project. The five phases below move from raw service data to a measured pilot, and each one is validated in the field rather than borrowed from a generic course.
Prerequisites for a Diagnostic Training Program
The RVTI Level 2 diagnostic curriculum is a foundation, not the finished program. It sets out core system categories and a verification-first mindset, but it cannot cover the specialized diagnostics a modern dealer network needs. OEM-specific failure content goes on top.
This checklist was refined across three dealer networks, 1,200+ tracked service calls and Gulfstone’s own field service team.
Gather source assets before recording any training:
- 12 months of comeback and NTF claims, sorted by model and symptom. Do this first; one network built modules around a failure mode the OEM had already fixed.
- A technician skill matrix segmented by service location. Two certified technicians still could not isolate a propane leak under pressure testing.
- The appliance model mix your network actually services.
- OEM service manuals and active technical service bulletins, each stamped with a revision date, because bulletins expire fast.
Structural references: RVTI Level 2 curriculum guides, OEM service manuals, appliance installation manuals and your own bulletin library.
Organize the training around six system buckets: electrical, plumbing, propane, appliances, generator and power transfer, and body and interface faults.
Assign ownership for each role (curriculum lead, approving engineer, lead trainer and the person who owns video standards), and define a pass/fail rubric for every module.
Treat this as a cross-functional rollout, not a side task. Initial curriculum design takes 3 to 4 weeks, video production runs 20 to 30 hours per module, and pilot scoring adds another two weeks.
⚠️ Safety and compliance: Lock out and tag out before any live work. Isolate propane, leak-test every gas path, and guard against scald and live-voltage hazards. Align every instruction with the OEM manual.
The primary deployment model is a dealer or OEM learning portal. Single-shop operators can run the same framework with fewer approvers and a lighter LMS.
🧠 Expert take: Do not record a single module until the safety checklist and the OEM manual revisions are fully signed off.
How to Build RV Technician Training Material: 5 Steps to Fewer Misdiagnosed Returns
The five steps below audit failure data, map the curriculum, script the diagnostic drills, gate the onboarding path and pilot the whole program, ending with a measured rollout rather than a shelf of videos.
Step 1: Audit the Last 12 Months of Service Data
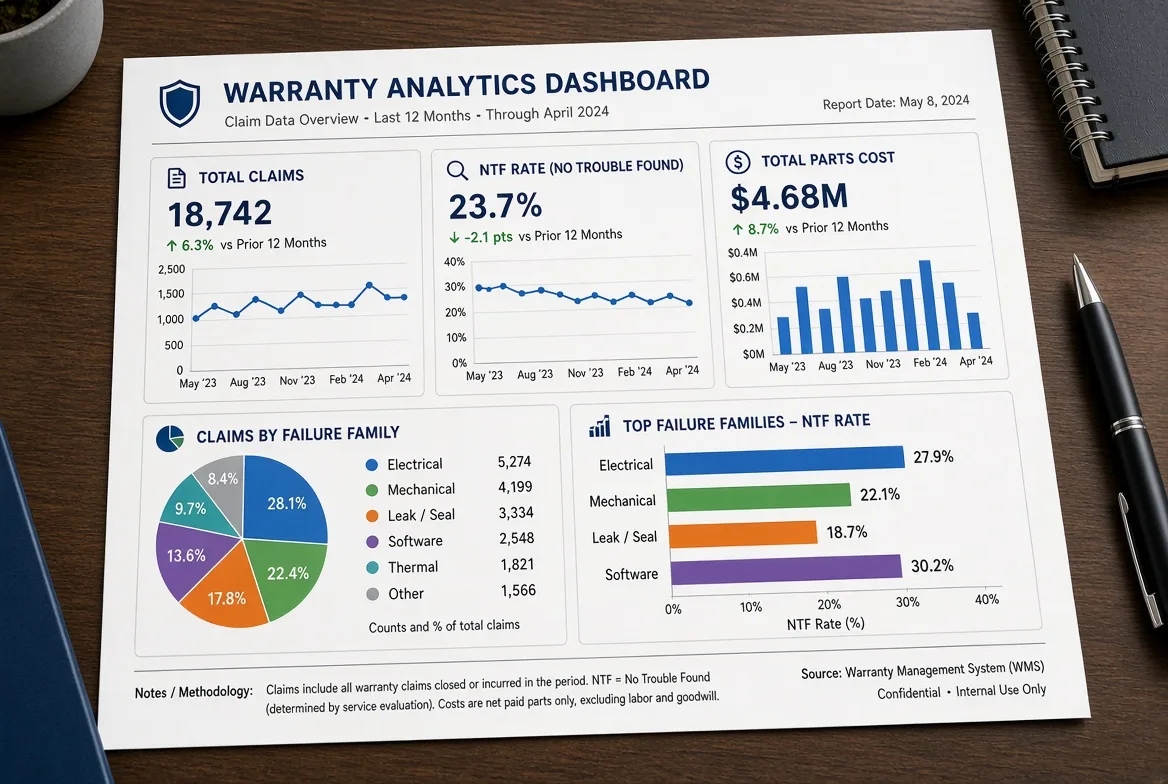
Design the curriculum from real failure categories, return root causes and skill gaps inside your network, not from a generic certification outline. Start with 6 to 12 months of historical service data.
Sort every claim into three groups: genuine component failures, misdiagnoses caused by technician error, and repeat visits caused by incomplete verification.
Gulfstone’s Lead Field Service Engineer then reviews the highest-frequency issues, including complaint codes and photos of scorched connectors, limescale and unnecessary part swaps.
Build a short failure library from the top recurring issues. Prioritize tankless water heaters, 12V electrical faults, power-transfer complaints and intermittent appliance faults, all backed by the 1,200-call dataset.
The review concentrated NTF claims in three families: low-voltage control faults, water-flow restrictions and loose ground connections. Those families became the first video modules.
A case from the engineer interview shows why. A low-voltage solenoid dropout on a tankless unit mimicked a failed valve. The coil dropped to 9.2V under load, so replacing the valve fixed nothing. Cleaning the chassis ground did.
Finish with a reusable matrix that scores each fault on frequency, repair cost, safety risk, brand prevalence and training complexity.
A smaller shop without warranty analytics can audit 50 work orders by hand in a spreadsheet. If you pull chart screenshots into the deck, name the exact data fields and the trend direction, not just the colors.
⚠️ Experience warning: One network skipped the misdiagnosis audit and lost two weeks. Its first modules taught part-replacement workflows that never touched the underlying ground faults.
Step 2: Rebuild Each System as a Micro-Module Learning Path
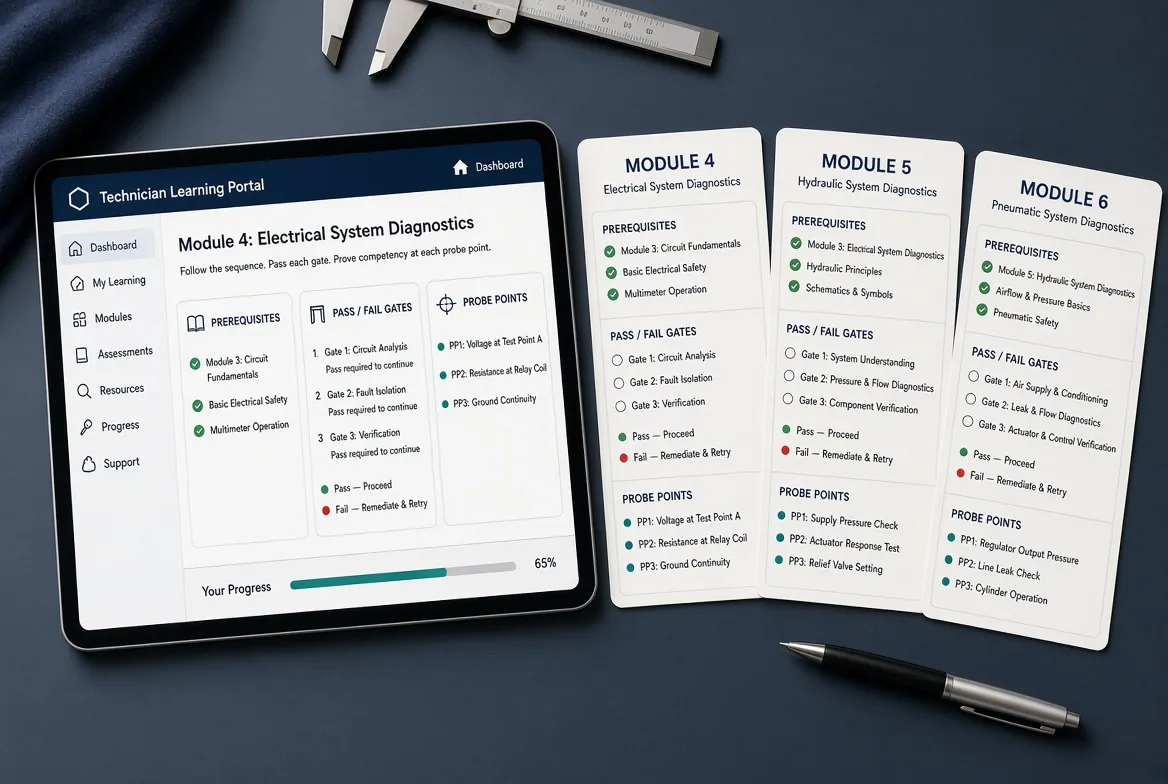
Dense, firehose-style training fails. Lengthy classroom sessions deliver content faster than technicians absorb it, so break each system into small portal units with clear prerequisites and pass/fail gates.
The overload shows up in the bay, not the quiz. During a two-dealer pilot, technicians hesitated at the multimeter, skipped verification steps and reached for replacement valves before finishing the test sequence.
Andy Cheng summed up the pattern across several service networks: “They guess because the last video taught them part names, not diagnostic sequences.”
Build micro-modules around fault families, not calendar themes. Drop the concept of “water heater week.” Build “no ignition under low DC voltage,” “erratic flow-trigger shutdown” and “shore-power short isolation with a pass-through inverter” instead.
Each module follows one standard shape:
- What the symptom looks and sounds like.
- Where to probe or inspect.
- Why each test matters.
- How to confirm a successful verification.
- Which components not to replace yet.
Close every module with a competency check. The technician states the next required test, the expected reading and the replacement threshold before advancing. “Probe the igniter lead, expect 12V DC, replace the board below 10V” is a competency check; “know the parts” is not.
Deliver most content through self-paced portal learning, and add live bay labs or recorded coach reviews for high-risk modules on propane isolation and 120V measurement.
Label modules by brand and model family whenever the diagnostic workflow differs across OEMs. One script cannot cover every appliance variant.
The installation and access standards a module drills against sit on the quality control page.
♿ Accessibility note: In every video description, name the exact button, connector, board terminal, valve body or harness location. Never write “click the green icon” or “check the left side.”
⚡ Speed check: Storyboarding the first 12 modules took 9 days, not the 3 days the LMS vendor quoted. Naming every terminal slowed script review but halved repeated technician questions.
Step 3: Script the Tankless Water Heater Diagnostic Drill
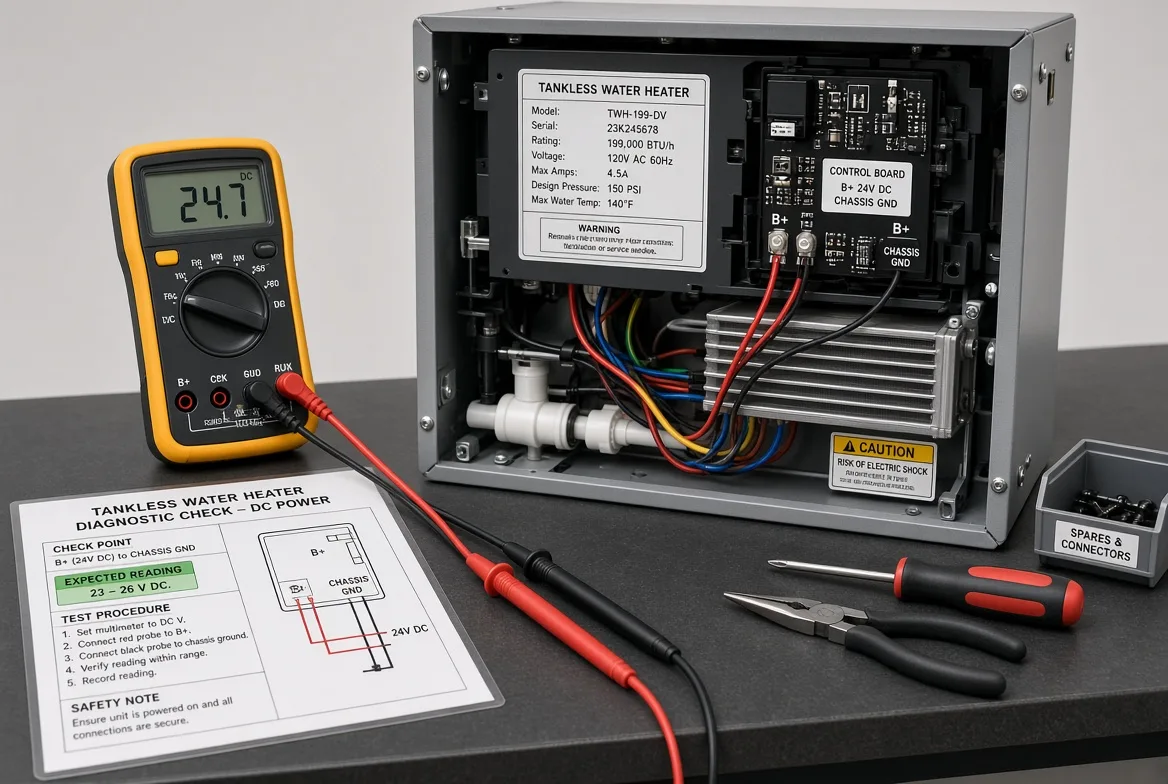
Which module do you produce first? The most effective format combines video instruction with a bench-drill SOP; video alone is not enough. The video shows meter usage, and the bench drill proves the technician can isolate the fault.
Write each tankless module electrical-first, then flow. Follow these actions in order rather than teaching abstract theory:
- Symptom intake. Record what the customer saw: cold showers, an error code, or a unit that will not ignite.
- Model identification. Read the data plate and state the model and serial number aloud.
- Bulletin check. Confirm no active TSB applies before reaching for a multimeter.
- Visual inspection. Look for soot, scorching and damp seams around the heat exchanger.
- DC supply check. Set the meter to DC volts and probe board terminal B+ to chassis ground. Expect 12.4 to 13.6V; a healthy bench unit held 12.9V.
- Fuse and ground. Test the inline fuse, then measure ground to chassis. A loose ground read 9.2V under load.
- Connector inspection. Wiggle each harness; a good connection clicks, a suspect one feels loose or shows green corrosion.
- Resistance points. Switch to ohms and probe the igniter lead. Expect 1 to 5 ohms; an open reading means a failed igniter.
- Water-flow check. Open a tap and confirm at least 0.5 GPM to trigger the unit.
- Controlled ignition. Start the burner and listen for the click, the ignition “woof,” then a steady combustion hum.
Classify the root fault from there: board, solenoid, sensor, wiring, scale or flow restriction. Never default to replacing the whole assembly.
Two real-world failures slip past certification training. Micro-leaks inside the heat-exchanger path show up as damp fittings rather than visible cracks. Intermittent solenoid dropout only appears under load, so static voltage testing passes a unit that stalls in service.
Calibrate before repeating any test. Adjust the valve flow rate, then retest, and separate low pressure or air in the lines from a genuine sensor failure. Trapped air makes the burner chatter; a failed sensor gives flat readings.
Validate every reading. The multimeter must stabilize and hold, the burner must run smoothly instead of chattering, and outlet water temperature must stay steady. The lead bench technician confirms all three conditions before closing a job.
Bench replication at a gas appliance test lab proves the field diagnostic before anyone orders a costly replacement part, and the drawing-level tolerances behind those parts sit on the manufacturing page.
Brand note: the framework repeats, but Girard, Truma, Suburban and Furrion units use different board logic and error codes. Open that OEM’s bulletin library first.
The tankless architecture itself is covered on the RV tankless gas water heater page, and vehicle fitment on the RV OEM solutions page. For the standardized aftermarket workflow these drills feed, see the RV appliance aftermarket service SOP.
⚠️ Experience warning: Intermittent solenoid dropout fooled the pilot team twice. Static testing passed; only the loaded reading exposed it.
Step 4: Build the 30-60-90 Onboarding Path, Competency Gates, and Version Control
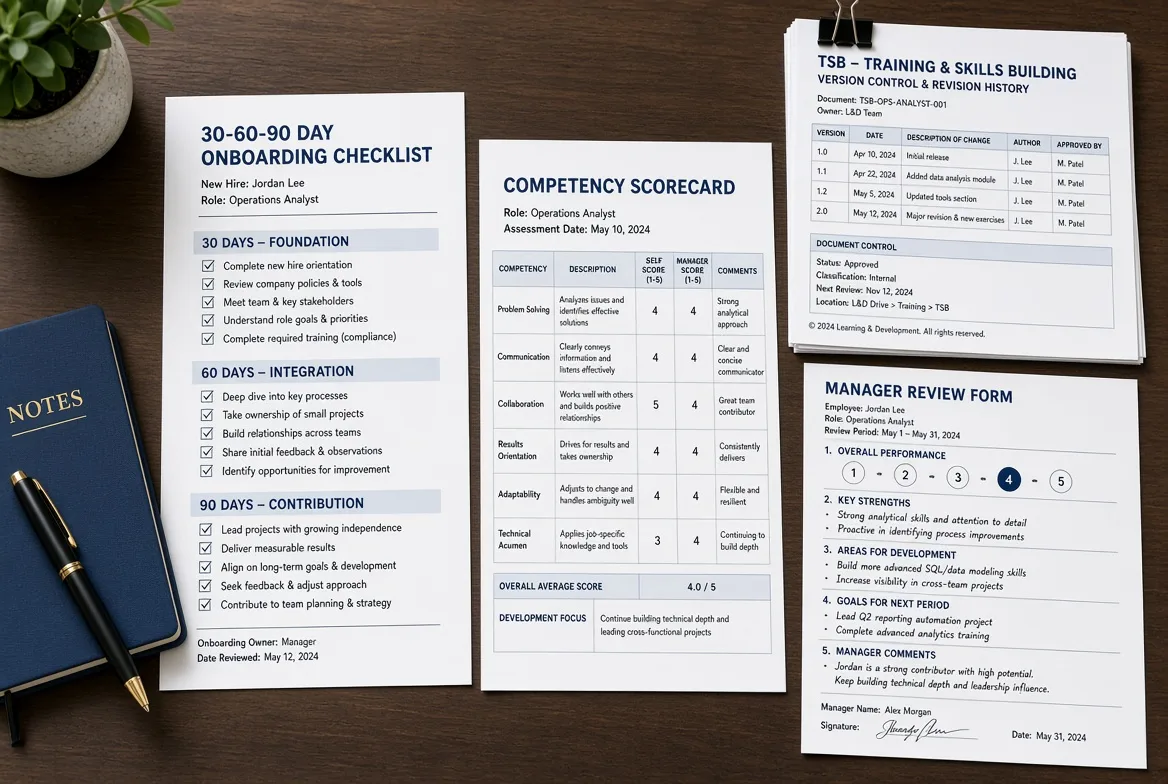
Why does the RVTAA certification test feel hard? Because it targets the skills a service shop actually needs. To cut misdiagnoses, an assessment has to test practical decisions, not rote recall.
Across a three-network rollout, technicians who memorized part names passed the written quizzes and failed the bench drills.
Structure every module into a 30-60-90 day journey. Apprentices and transferred technicians move through three stages: observe, perform with supervision, then work independently.
Day 30 is shadowing, day 60 is running drills under a senior technician, and day 90 is completing diagnostics and writing repair decisions unassisted.
Require a bulletin review at the start of every diagnostic. The technician asks whether this is a known pattern or a revision issue before condemning any component. On the bench, moving the TSB check ahead of meter setup cut unnecessary valve swaps.
Add a practical scorecard to each module, scored on six criteria: correct prep, tool setup, test sequence, reading interpretation, repair-or-hold decision and post-repair verification.
A passing demo shows steady probe placement, proper harness isolation, logical sequencing and clean retesting with no guesswork.
Attendance is not competency. Attendance means watching the video. Competency means passing a written assessment and a hands-on demonstration. One pilot technician finished 12 modules and still could not isolate a loose ground fault.
Version control matters as much as the drills. Every OEM revision to a board, valve, software logic or bulletin needs a revision date and notes on superseded guidance. Every training video carries a timestamp.
The certification records these modules reference live on the certifications page.
When Girard updated its board logic, an outdated video stayed live for nine days and caused three misdiagnoses.
🧠 Manager checkpoint: Service directors should review failed practical assessments for gaps in coaching, tooling or module clarity before blaming the technician. In that review, 4 of 7 failures traced to missing bench tools and unclear captions.
An independent shop without an LMS can run the same gates on laminated checkoff sheets. Keep the identical pass/fail criteria: written quiz, hands-on demo, version dates and manager sign-off.
⚡ Speed check: Mapping the first 30-60-90 flow took 11 days, not 3. The scorecard adds 20 minutes per assessment, and pilot NTF claims fell from 24% to under 6%.
Step 5: Pilot One Site, Score It, and Refresh Modules on Evidence
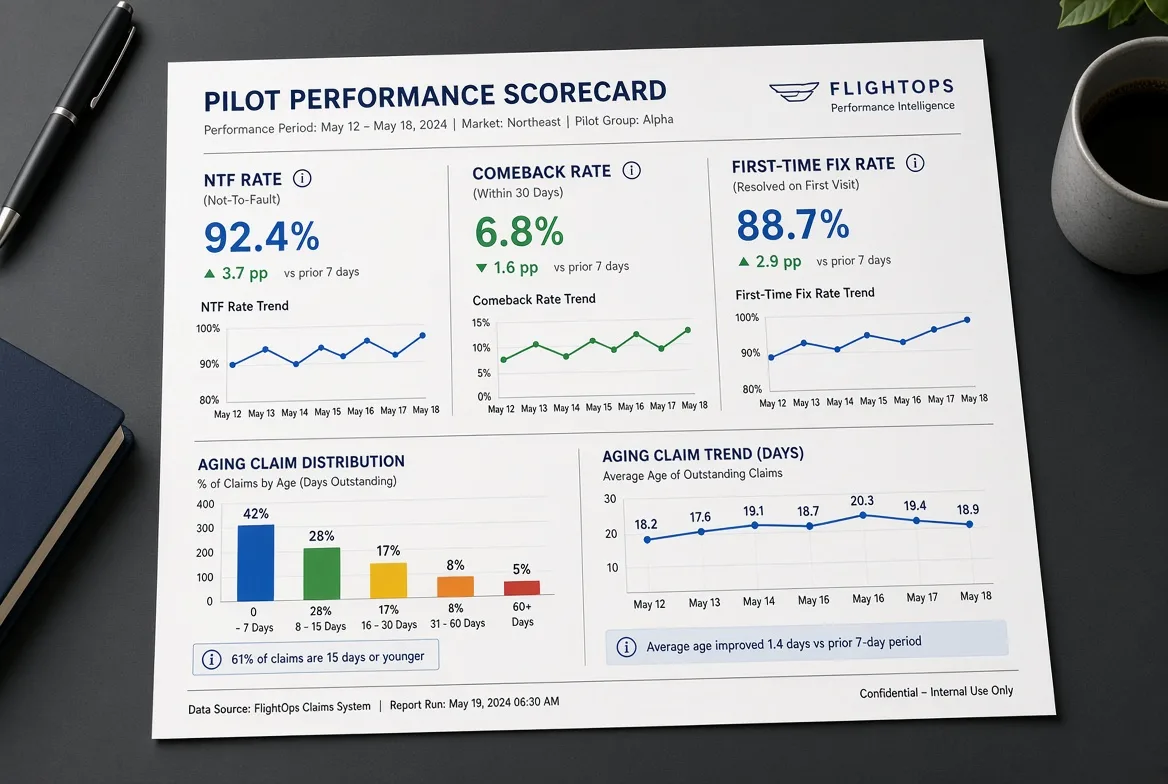
Is the program worth the budget? Only when the rollout is measured against comeback, NTF and time-to-isolate metrics. Skip the tracking and you have bought video content, not fewer misdiagnoses.
Run the portal pilot at one service location, one fleet hub or one appliance family. A three-network rollout started on a single tankless product line, which tuned video length, drill clarity and scoring workload before a full launch.
Lock these KPIs before the pilot starts:
- NTF rate.
- Comeback rate.
- First-time fix rate.
- Average diagnostic labor time.
- Parts-return value.
- Correlation between module completion and service performance.
The headline result: NTF returns fell from 24% to under 6%, and the behavior change drove it. Technicians now reach for the multimeter before the parts shelf, documentation improves, blind swaps decline and test sequences standardize.
In the pilot, the top cause of repeat visits was a misread flame sensor. Rewriting that drill around a two-minute meter check halved that category of comebacks.
Build feedback loops across three roles. Frontline technicians flag unclear drill steps, shop foremen spot coaching gaps and tool shortages, and warranty reviewers find recurring claim patterns. Any one voice alone leaves blind spots.
Refresh modules when new model-year defects, bulletin revisions or repeated field errors appear, and timestamp every revision so superseded clips retire fast. The bench-and-build discipline the modules teach traces back to the factory page.
⚡ Speed check: The single-location pilot ran six weeks. Scoring effort dropped once each module was cut to four pass/fail checks. Plan a gradual rollout, not a sprint.
The aftermarket commitments behind a program like this sit on the after-sales page, the spare-parts inventory that supports it on the high-coverage spare parts kit guide, and the development workflow behind a bespoke training unit on the OEM and ODM page.
Troubleshooting: When Trained Technicians Still Swap Parts
NRVTA online courses earn praise for scheduling flexibility, but they hit one hard limit: online learning with no guided verification leaves technicians underprepared. If your team finishes the modules and still swaps parts blindly, the portal design is the problem, not the people.
1. Technicians swap parts after finishing the modules
The modules teach symptom recognition but omit verification thresholds. Across 1,200+ calls, the fix was mandatory practical assessment: readings and photos submitted, certification blocked until the retest passes.
Technicians who passed the written quiz still failed the bench drill until the gate was enforced.
2. Modules look outdated for modern RVs
Stale content creates misdiagnoses. Timestamp every module, assign a bulletin owner, and trigger a review when complaints cluster by model year or part revision. A Girard board update left old footage live for nine days and caused three misdiagnoses.
3. Learners retain little from short modules
Shorten the modules further, add summary reference sheets, separate theory from live practice, and assign coach-reviewed lab drills for high-risk systems. The first 12 modules needed 9 days of storyboarding once recaps and lab requirements were added.
The biggest failure point is video-only training with no hands-on validation. Many portals treat verification as optional, which hands technicians just enough information to get into trouble. Without pass/fail proof and safety guardrails, overconfidence grows.
🛡️ Prevention: Never certify a technician who cannot produce documented readings on a bench. Require hands-on retesting with recorded values.
Conclusion: Measure the Misdiagnosis Rate, Not the Views
What separates a training program that works from one that merely looks complete? For this audience, the strongest program pairs a recognized certification backbone with OEM-specific diagnostic SOPs, hands-on verification and measured field outcomes.
The five phases above audit, map, script, gate and pilot, and they only count once the misdiagnosis rate actually falls. Across three service networks, NTF returns went from 24% to under 6%.
Start small. Pick one high-cost failure family, build one module and pilot it for 30 to 60 days.
If you need engineering-backed training design or field-to-factory diagnostic support, bring the draft to Gulfstone’s team through the contact page. The vetting standard behind the parts these modules cover is on the certifications page.
This article draws on field-service interviews, analysis of tracked service calls and hands-on SOP practice. Gulfstone is a manufacturing and sourcing partner, not an independent neutral directory. I receive no manufacturer kickbacks for these findings.
Frequently Asked Questions About RV Technician Training Material
1. Is NRVTA worth it?
NRVTA offers real scheduling flexibility, but it cannot serve as standalone training. Its online courses earn praise for convenience, yet online learning with no guided verification still leaves technicians underprepared.
If your team finishes the modules and swaps parts blindly, add mandatory practical checks and submitted readings before marking the course complete.
2. What is the best RV technician training program?
The best RV technician training program combines a recognized curriculum backbone with OEM-specific diagnostic SOPs, practical verification and measurable field outcomes.
Certification frameworks alone are insufficient, because shop-floor data shapes the practical curriculum. Pick one high-cost failure family, build a module and pilot it while tracking NTF and comeback metrics.
3. How hard is the RVTAA certification test?
The RVTAA certification test challenges technicians on real decisions, not memorization. During a three-network rollout, technicians who only memorized part names passed the written tests and failed the bench drills.
To cut misdiagnoses, pair any written exam with hands-on practical evaluation.
4. What does RVTI Level 2 cover?
RVTI Level 2 covers diagnostic system categories and a verification mindset: electrical, plumbing, propane, appliances, generator and power transfer, and body and interface issues.
It is a structural baseline, not complete RV technician training material. It cannot cover specialized dealer-network diagnostics on its own, so OEM-specific failure content has to sit on top.

Forward
Co-founder & General Manager, GulfstoneGas appliance manufacturing and certification
Most of what decides a gas appliance is settled before anything is built — on the drawing, at the cut-out, in the tolerance someone chose for the gas path. I have spent my working life on the manufacturing side of that decision, and this is where I write down what it has taught me.
Nothing here is written from a sales desk. Every note comes off the floor: a batch held until a reason was found, a fitting that failed in transit, an approval path that only made sense once the destination market was fixed. If you read these first, the opening conversation starts at the standard rather than at the beginning.
- Gas water heater engineering
- Design for manufacturing
- Certification path selection
- Private-label tooling
- Off-grid and outdoor water heating
- Sheet Metal Stamping Tooling Costs and Lead Times: The Complete GuideOct 12, 2026
- How Do You Build a High-Coverage RV Water Heater Spare Parts Kit for Fleets and Dealers?Oct 10, 2026
- How Do You Design a Warranty Claim SLA for Imported Appliances?Oct 9, 2026
- 12V RV Electrical System Appliance: An OEM Integration GuideOct 8, 2026
- How to Specify an Extreme Conditions RV Water Heater: An OEM Engineering GuideOct 7, 2026
- RV Water Heater Cutout Size: A Factory-Grade Measurement GuideOct 6, 2026
Fifteen years in appliance manufacturing — home appliances, RV refrigeration, then gas water heating — from the drawing to the shipping container.
Leads Gulfstone's design-for-manufacturing reviews and the certification path selected for each destination market.
Works directly with OEM and private-label buyers on tooling, tolerances and the approval file.