Table of contents
- Key Takeaways
- How Do the Two Controller Classes Compare?
- Why Does the Wiring Diagram Decide the Platform?
- What Does the Fault Code Display Actually Tell a Technician?
- Prerequisites: Gear, Documents and a Wet-Bay Setup
- RV Water Heater Controller Diagnosis: 5 Steps From Feed Test to Part Swap
- What Does a 20× PCB Teardown Show About Environmental Hardening?
- How Do the Two Classes Behave Under Thermal and Flow Load?
- How Does the Sourcing Model Affect Fleet Standardization?
- What Are the Pros and Cons of Each Controller Class?
- Which Controller Should You Specify or Buy?
- Frequently Asked Questions About RV Water Heater Digital Controllers
Key Takeaways
- Specify the OEM platform for new builds and fleet standardization. Buy a brand panel for an exact service replacement.
- A brand panel is plug-and-play only into the harness it was built for, and that convenience is why mixed fleets end up with more SKUs and shallower fault codes.
- Four checks come before any part swap: loaded 12 V feed, ground return, water flow, gas-valve relay path. A weak feed and a dead board look identical on the display.
- Under 20× magnification the OEM board showed full conformal coverage, staked joints and elastomer grommets. The brand board showed none of the three.
- On a 50-unit programme the OEM harness plan added three days before build release and removed a service ambiguity the fleet had already paid for once.
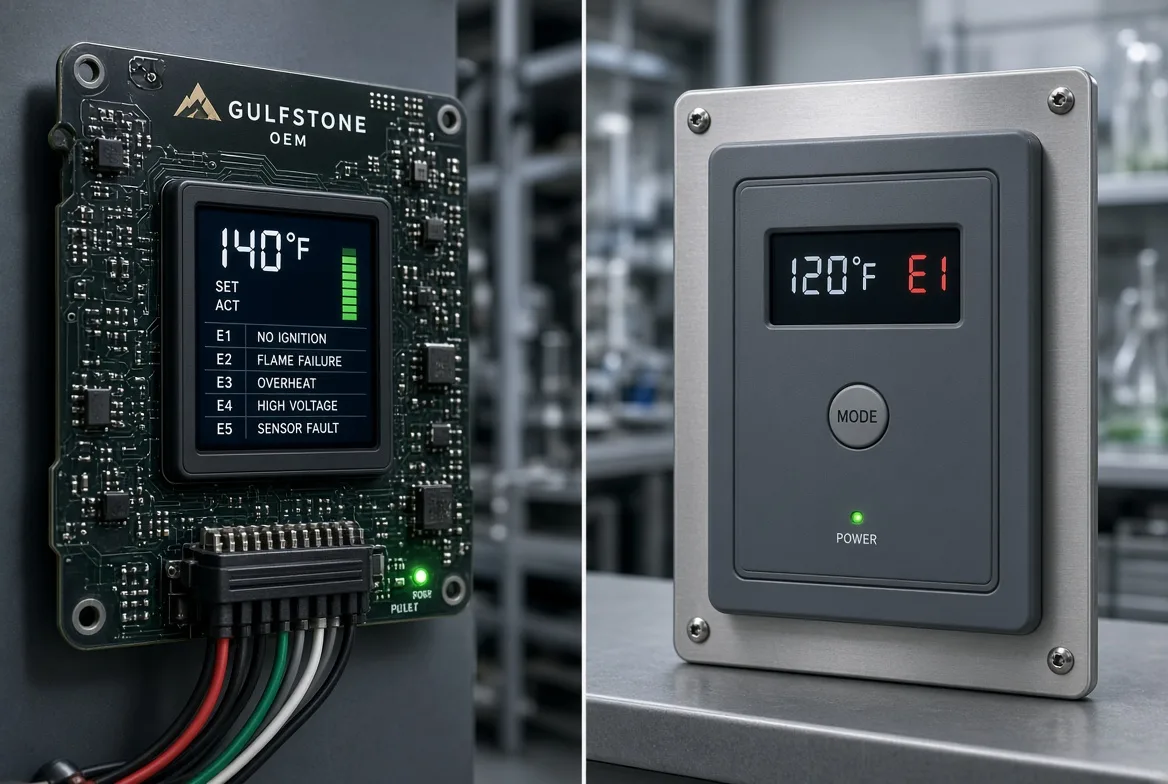
Two kinds of part are sold as an RV water heater digital controller. The first is a control platform an OEM specifies into a build, with the harness, code set and diagnostics designed alongside the heater. The second is a replacement panel made for one brand’s heater, sold to put a dead unit back in service.
Gulfstone builds the first for new programmes. Suburban and Girard sell the second for their own installed bases, and for that job the brand panel is often the right answer. Everything else is decided by wiring, fault reporting, board protection and fleet risk, not by display features or thermostat settings.
The findings come from 12 V bench runs and a wet-bay mock-up in the Foshan lab, plus 20× macro photos, manufacturer training documents, part listings and Gulfstone lot records. During the wet-bay run the boards were sprayed at the start of a hard 12 V pull, when a wet connector is most likely to fault.
How Do the Two Controller Classes Compare?
| Feature | Gulfstone OEM digital controller platform | Brand replacement panel class (Suburban, Girard, Furrion, Fogatti) |
|---|---|---|
| Intended use | OEM spec-in, fleet standardization, retrofit | Exact service replacement; limited cross-brand retrofit |
| Electrical architecture | 12 V DC, separate ground, open data-pair pinout | 12 V DC, brand harness, sealed connector |
| Display and fault reporting | Live setpoint, mapped error codes, soft reset | Basic setpoint, generic code, power-cycle reset |
| Environmental protection | Conformal coat, reinforced solder, sealed enclosure | Panel-level coat, standard solder, OEM enclosure assumed |
| Temperature control | Published °F setpoint, flow-compensated logic | Fixed brand °F range, flow-sensitive cutoff |
| Service model | Harness changes possible, lower fleet install complexity | Direct replacement, no harness change, plug-and-play |
| Unit economics | Program-based OEM sourcing, lower fleet lifecycle cost | Replacement-panel price band, higher per-unit service cost |
| Compliance evidence | CSA-facing QA records, batch traceability | Brand CSA file, part-number traceability |
Read the first four rows as engineering and the last two as commercial. Neither column wins both. For the platform itself, the OEM/ODM development route starts from the harness and the code set, not from a catalogue part.
Why Does the Wiring Diagram Decide the Platform?
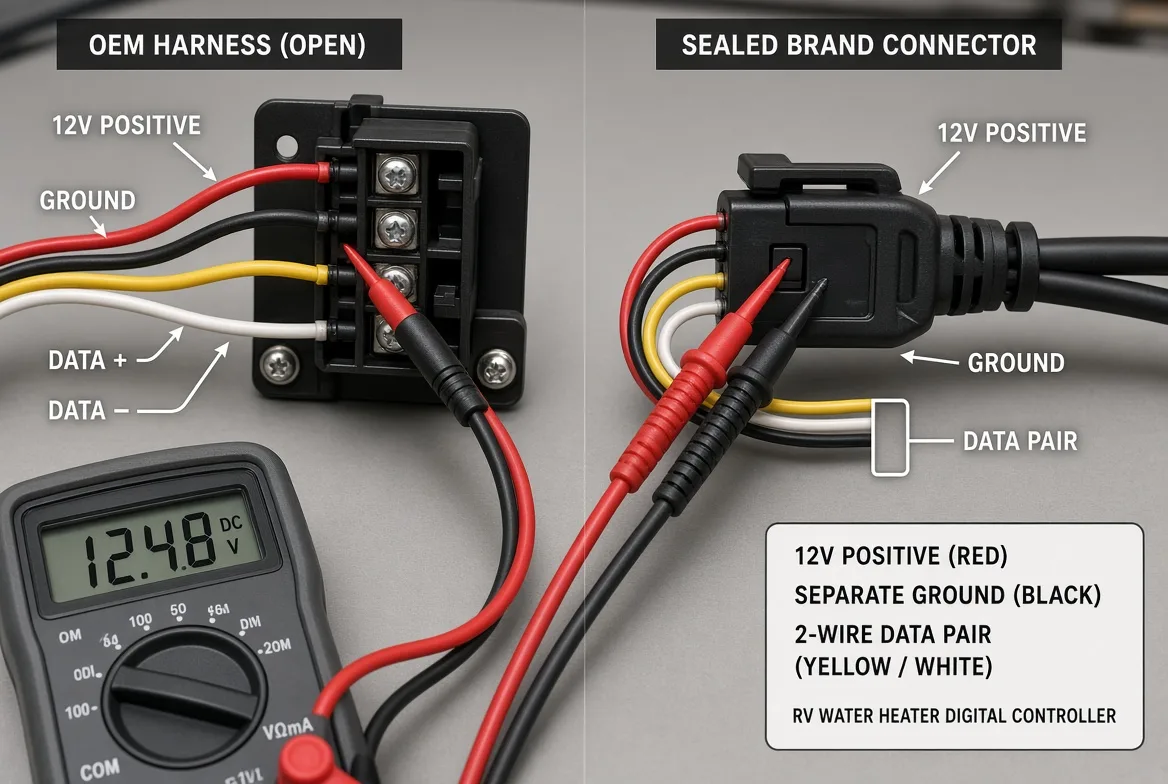
The wiring diagram that repeated across the units on the bench was a common one: 12 V positive, a separate ground, and a two-wire data pair. That is a common architecture, not a universal pinout, and any technician who assumes otherwise will meet a brand that wired it differently.
A data pair is two signal wires carrying serial communication. It never carries heater power. Mixing the two at a splice is how a working controller becomes a warranty claim.
Gulfstone keeps that harness open enough for coach integration. A brand replacement panel assumes a brand harness and a sealed connector, which is fine inside its own family and a dead end outside it.
On a new programme that mapping belongs on the harness and connector drawings, not in a technician’s notebook.
The difference shows up on long coach runs. The feed should hold within about 0.5 V under load, and the connector family has to match the service loop, the fuse location and the harness labelling. A cheap panel swap fails quietly when the supply sags: the screen sees low voltage and reports a ghost fault.
⚡ Power move: Feed the controller from a dedicated 12 V fuse at the coach panel. That isolates it from voltage sags drawn by other accessories on the same circuit.
What Does the Fault Code Display Actually Tell a Technician?
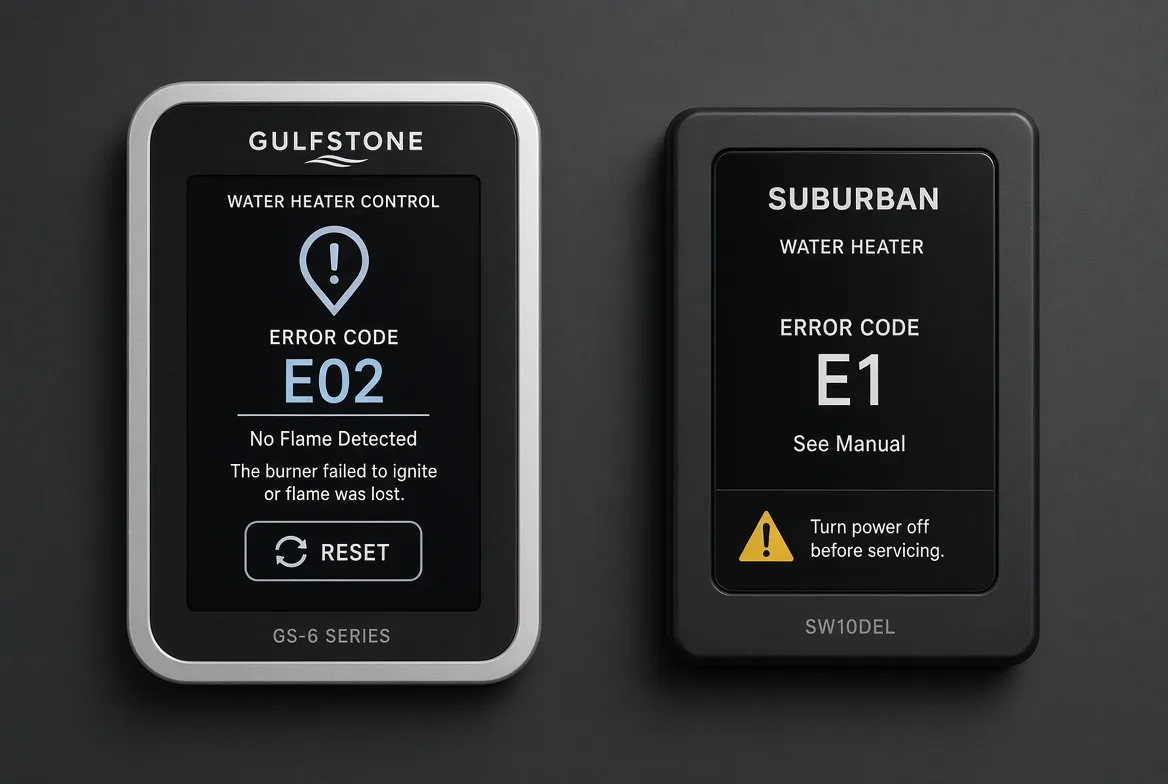
The Gulfstone display reports a named condition, such as no flame detected, with the likely cause and a reset control on the same screen. The Suburban-style panel in the next photo reports E1 and tells the owner to see the manual.
That gap costs time, not parts. A technician holding a mapped code can go straight to the gas valve, the ignition control pin or the thermistor table. A generic code sends the same technician to the manual, then to a power cycle, then to the parts shelf.
The training side matters as much as the code table. A mapped code is only useful when the technician has been taught what each one rules out, and that is the same argument behind the technician training material a dealer needs anyway.
🧠 Expert take: Judge a controller by the action its worst code points to. If a code cannot separate a sensor fault from a venting fault, it is a light, not a diagnostic.
Prerequisites: Gear, Documents and a Wet-Bay Setup
The walk-through above covers the heater side of the same job. For the controller side, the bench needs no more than this:
- A DC multimeter rated for the coach’s 12 V system, with min/max capture.
- Fused test leads, so a slipped probe does not weld itself to a terminal.
- A switchable load, such as a 12 V lamp bank, to watch the feed sag under current.
- The heater’s wiring diagram, fuse map and thermistor resistance table.
- A wet-bay mock-up or a real wet bay, because condensation is the failure the bench misses.
⚠️ Safety first: Shut the gas supply at the cylinder before any test that opens the gas-valve circuit, and disconnect the 12 V feed before pulling a connector. A controller swap done live can arc a latch and start the fault it was meant to fix.
RV Water Heater Controller Diagnosis: 5 Steps From Feed Test to Part Swap
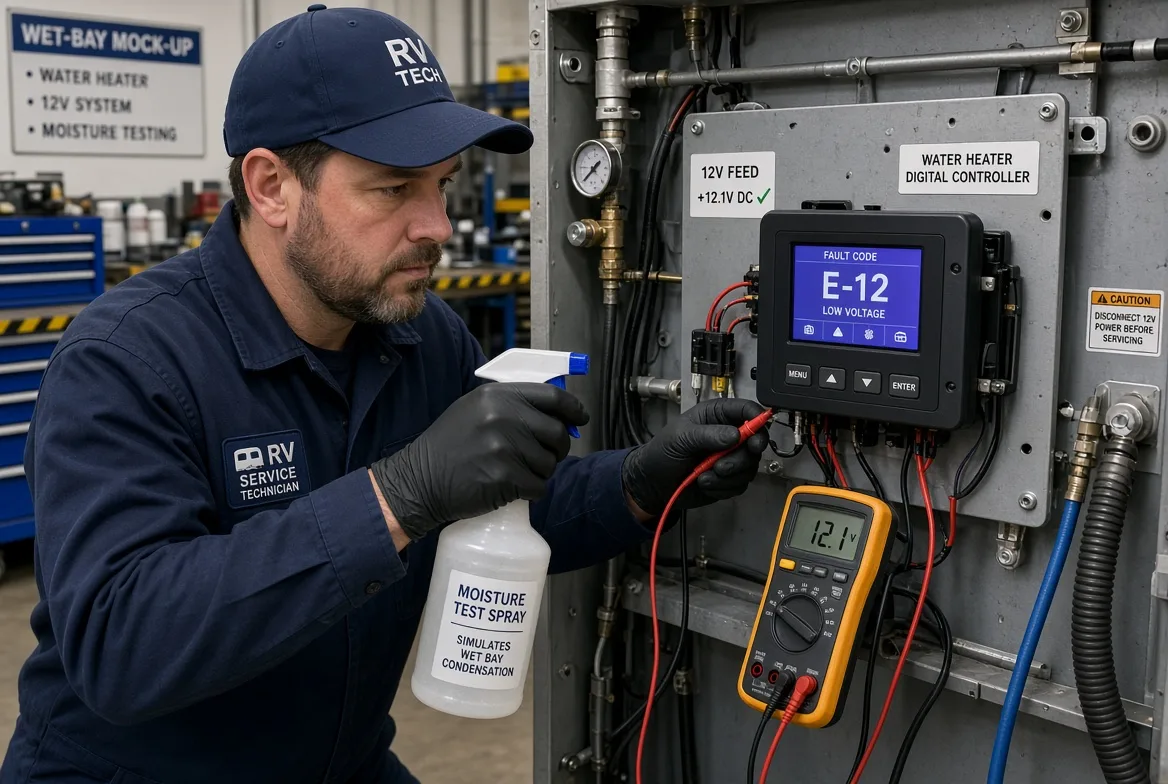
The five checks run in order, and each one either clears the controller or narrows the fault to a part you can name before you buy anything.
1. Check the 12 V feed at B+ and ground
Key on, meter DC across the controller feed. A loaded reading below 11.5 V sends you to the fuse at the battery or coach panel, then to the ground return. No-load voltage proves nothing about a circuit that fails under current.
2. Check the ground return
Ground continuity should read under 0.1 Ω. A ground that measures fine cold and climbs warm is a return path problem, and the controller will report it as an internal fault. Inside a coach, NFPA 1192 treats a loose ground return as a safety fault, not a nuisance.
3. Check the connector before the board
Look at the latch. A connector that is seated but not latched will pass a wiggle test in the shop and drop out on the first rough road. Backprobe display power at the connector, not at the board.
✅ Verification: A controller with no display voltage at the board is dead. A controller with correct display voltage and a blank screen has a display or board fault, and the harness is not the problem.
4. Meter the gas valve and its relay
During a call for heat, meter the solenoid. A relay output is a switched 12 V feed, so read the drop across the relay contacts while they are energized. More than 0.3 V there is resistance in the relay or the harness, not in the gas valve.
Then check the ignition-control pin during spark command. A pin that collapses points to the board or the relay; a pin that holds points to gas pressure, the orifice or airflow.
5. Compare the thermistor to its table
Measure resistance at ambient and compare it with the published table. An open or a short means sensor or harness. A sensor that matches the table while the same code persists points to the board’s analogue input.
🚀 Actionable insight: Write the five readings on the work order before touching a part. The numbers turn a guess into a diagnosis, and they settle the warranty argument when the claim comes back.
What Does a 20× PCB Teardown Show About Environmental Hardening?
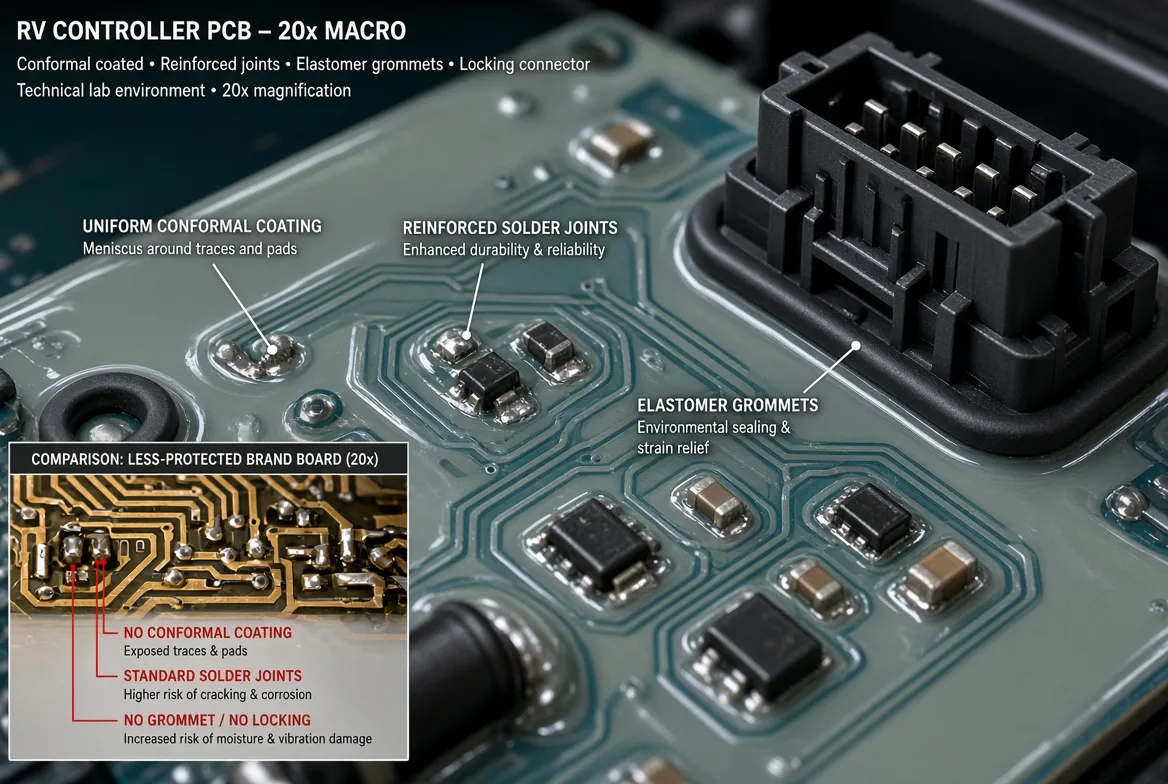
Under 20× magnification the Gulfstone board showed an even acrylic conformal coating, with a visible meniscus where it pulled back from high-risk traces. The connector area carried extra edge sealing, and the relay zone had a second coating patch.
The solder fillets were concave and uniform. Joints in vibration-prone positions carried extra solder and adhesive staking, the connector had a locking latch and strain relief, and the board sat on four elastomer grommets.
The brand panel opened beside it had standard solder, no visible edge seal at the connector, and two self-tapping board mounts. That is not proof of failure. It is proof of a shorter durability record, because in a wet bay the coating decides whether condensation reaches a trace.
Lot records in the quality control file put numbers behind those details. The pre-CSA lot ran 500 thermal-shock cycles from -20 to 60°C with a ten-minute dwell, eight hours of random vibration per axis at 2.5 g RMS, and a 48-hour soak at 85% relative humidity.
Release held only if the lot produced zero relay chatter, zero cracked fillets at 20×, and insulation resistance at or above 100 MΩ. It did. The vibration profile follows SAE J1455, the chassis-duty standard a coach builder already tests against.
The line caught what the drawing missed. On a Friday audit at a partner plant, a 20-unit harness lot failed final test because the data-pair latch was not fully seated after the potting cure.
The fix was a go/no-go seating fixture with an audible click check, plus a 20 N pull held for three seconds on every unit. Rework used new latches, and the repeat failure rate on the next lot was zero.
🔬 Test note: Coat, staking and connector retention are the three things a buyer can see. Ask for all three on the sample board, and ask what the lot pass condition was.
How Do the Two Classes Behave Under Thermal and Flow Load?
Setpoints differ across the class, and the published ranges matter less than what the controller does at the edges. Suburban training material puts its start range around 106 to 108°F. Fogatti-style panels expose 95 to 123°F. A child-safe maximum caps the top end on any setpoint used in a rental or family coach.
The harder test is recovery. A brand panel on the bench short-cycled when cold water mixed at the faucet outlet. The controller read unstable flow and cut out. The Gulfstone board held its setpoint logic through the same mix and recovered once flow settled.
The reset path separates the two classes just as cleanly. A soft reset clears a latched condition without a full power cycle, which matters when the unit sits behind a panel the owner has to unscrew. A brand panel that only resets by power-cycle teaches the owner to cycle power for problems the board did not cause.
Heavy cold mixing destabilizes flow in any system, and the controller should not add a vague cutoff on top. What the user needs is a stable setpoint and a restart they can perform themselves.
How Does the Sourcing Model Affect Fleet Standardization?
Replacement-part listings put the Fogatti, Girard, Furrion and Suburban class in a scattered price band. The part is easy to buy. The lifecycle cost is the part nobody puts on the quote: every brand added to a fleet adds a SKU, a connector family and a different fault language.
That is how a service department ends up stocking four panels for one function and still guessing which one a technician needs. Standardizing on one controller platform through production removes the guess and makes fault behaviour predictable across the fleet.
That fragmentation shows up late, in after-sales data rather than on the order sheet.
The caveat is real. If the installed base is already locked to one heater family, a direct replacement panel usually wins on turnaround, and no engineering argument changes that for a unit that has to leave the bay today. The Suburban SW6D replacement walk-through shows how far that route goes before it stops fitting.
On a 50-unit programme the OEM harness plan added three days before build release. The buyer accepted the delay because the same plan cut per-unit service ambiguity, and three days up front is cheaper than a wrong-panel return in the field.
What Are the Pros and Cons of Each Controller Class?
Gulfstone OEM digital controller platform
Pros:
- Fits open integration: the harness logic plans longer coach runs and one platform across a fleet. The 50-unit plan above added three days and removed a recurring service guess.
- Documented durability: conformal coat, staked joints and grommet mounts, backed by 500 thermal cycles, vibration passes and a 48-hour damp-heat soak.
- Clearer diagnostics: mapped codes and a soft reset shortened the fault path after a low-voltage start, which cuts guess-part swapping on a one-call service visit.
Cons:
- Not a same-day swap: it will not drop into a locked brand harness without planning, so a service van cannot treat it as a universal drop-in.
- Validation burden: harness changes, technician onboarding and sign-off delay rollout. Budget engineering hours before production, or the first miswired harness becomes a callback.
Brand-specific replacement panels
Pros:
- Fast exact replacement: when the heater family is known, the panel swaps plug-and-play with no harness change and no engineering project.
- Lower sticker price: part listings put several panels below the OEM route, which suits a service department working to a narrow swap budget.
Cons:
- Fleet fragmentation: mixed brands mean more SKUs, inconsistent fault logic and more warranty noise. Every added SKU is one more chance to grab the wrong panel.
- Shallow durability record: less published detail on coating, QA history and control behaviour, so an early failure is hard to trace to design, batch or install.
💡 Buying note: Map every pin before any rollout. The three days spent on that map are the cheapest part of a standardisation programme.
Which Controller Should You Specify or Buy?
The right part depends on the role and the installed base, not on brand loyalty. The caveat from the bench still holds: some failures are wiring, fuse, flow or relay problems, and a new controller will not fix a blown fuse.
Specify the Gulfstone platform if you are a lead OEM electrical engineer on a new programme, a custom expedition builder who needs control over harness design, or a procurement lead standardising diagnostics across future builds. Open harness logic and mapped codes carry over into the RV OEM vehicle fitment work.
Buy a brand-specific replacement panel if you run maintenance on an installed Girard, Furrion, Fogatti or Suburban base and cannot justify harness or validation work. A plug-and-play swap gets the unit back in service today with no engineering project.
Repair first if the controller is blank or erratic and nobody has checked the fuse, the loaded feed, the ground, the flow conditions, the gas-valve relay path and the ignition-control pin. For a second read on harness and parts strategy, Steven Qian at Ningbo Hailida works the supply side of RV appliance programmes.
In short: spec the OEM platform for new builds, stock brand panels for exact swaps, and diagnose the simple faults before replacing hardware. An engineering review of a specific harness plan starts at the contact page.
Disclosure: the test method combined 12 V bench runs, a wet-bay stress test with a low-voltage start, 20× PCB macro teardown, manufacturer training documents and QA lot records. I receive no manufacturer kickbacks for these findings.
Frequently Asked Questions About RV Water Heater Digital Controllers
1. Why is my RV water heater digital controller not working?
Most controller faults trace back to the feed, the ground, the flow or the relay before the board fails. Check the 12 V supply at the controller and at ground under load; a sagging feed points to the fuse or the ground return. Replace hardware only after those checks come back clean.
2. How do I reset my RV tankless water heater controller?
Use the soft reset if the controller has one, otherwise power-cycle it. Before either, clear the obvious causes: low voltage, a loose connector, a flow trip. If the same code returns after two resets, treat it as a hardware fault and stop repeating the reset.
3. What temperature should I set my RV water heater controller to?
Stay inside the heater’s published range. Suburban training material puts its start range around 106 to 108°F, and Fogatti-style panels expose 95 to 123°F. A child-safe maximum caps the high end in family and rental coaches, so pick a setpoint the manual allows rather than a guessed number.
4. Why does my RV shower go hot then cold?
Cold water mixed at the faucet can drop flow below what the heater needs, and the controller cuts out to protect itself. A panel with a vague cutoff makes that worse by latching until someone resets it. A controller that holds its setpoint and recovers when flow returns keeps the shower usable.
5. What is the best RV water heater digital controller?
For OEM specification, new builds and fleet standardization, the OEM digital controller platform wins on open harness logic, mapped fault codes and board hardening. For an exact service replacement on a locked single-brand heater, a brand panel wins on turnaround and price. Match the part to the job.

Forward
Co-founder & General Manager, GulfstoneGas appliance manufacturing and certification
Most of what decides a gas appliance is settled before anything is built — on the drawing, at the cut-out, in the tolerance someone chose for the gas path. I have spent my working life on the manufacturing side of that decision, and this is where I write down what it has taught me.
Nothing here is written from a sales desk. Every note comes off the floor: a batch held until a reason was found, a fitting that failed in transit, an approval path that only made sense once the destination market was fixed. If you read these first, the opening conversation starts at the standard rather than at the beginning.
- Gas water heater engineering
- Design for manufacturing
- Certification path selection
- Private-label tooling
- Off-grid and outdoor water heating
- Top 8 Outdoor Portable Gas Water Heater Factories in China for B2B BuyersNov 4, 2026
- Custom RV Appliance Industrial Design: An OEM Brief to a Validated PrototypeNov 3, 2026
- How to Build Custom Thermostat UI Design Software for OEM Embedded PanelsNov 3, 2026
- Top 8 RV Water Heater OEM Suppliers Canada: Vetted for Volume BuyersNov 3, 2026
- Top 10 Portable Propane Water Heater Manufacturers USA: A No-Hype Buyer ShortlistNov 2, 2026
- PPWR Compliance Checklist for EU Water Heater Packaging: The 10 Documents Before the Container LoadsNov 2, 2026
Fifteen years in appliance manufacturing — home appliances, RV refrigeration, then gas water heating — from the drawing to the shipping container.
Leads Gulfstone's design-for-manufacturing reviews and the certification path selected for each destination market.
Works directly with OEM and private-label buyers on tooling, tolerances and the approval file.